
")
That drip, drip, drip… It might seem like a minor annoyance, but a leaky faucet can waste hundreds of gallons of water a year, adding unnecessary strain to your wallet and the environment.
Before you reach for the phone to call a plumber, consider tackling this common household issue yourself! In most cases, with a little know-how and the right tools, you can silence the drip and become a DIY plumbing hero.
Whether you’re trying to discover how to fix a leaky bathtub faucet or a kitchen faucet, Global Newsly will show you how to fix a leaky faucet yourself.
Identify the Cause of the Faucet Leak
The first step to fixing a leak is figuring out where it’s coming from. Grab your handy tools and get ready to discover how to fix a leaky tub faucet. Here are the usual suspects:
- Worn-out washers: These are small rubber rings that form a seal inside the faucet, preventing water from leaking. Over time, washers can wear out, crack, or become misshapen, leading to drips.
- Damaged O-rings: Similar to washers, O-rings are small rubber seals that create a tight fit between different faucet components. Worn or damaged O-rings can also cause leaks.
- Loose packing nut: This nut holds the faucet handle in place and compresses the washer to create a seal. If it gets loose, water can sneak past the washer and drip out.
- Faulty cartridge: In some faucets, a single cartridge controls both water flow and temperature. If the cartridge is damaged or worn, it might not create a proper seal, leading to leaks.
- Faulty ceramic disc: These faucets use ceramic discs to regulate water flow. If the discs become scratched or worn, leaks can occur.
Leak Location Detective Work
- Base of the faucet: This usually indicates a worn washer or loose packing nut in a compression faucet.
- Handle: A leak around the handle often points to a faulty cartridge or a loose handle screw.
- Sprayer connection: If the leak originates where the hose connects to the faucet, it might be a loose connection or a faulty hose.
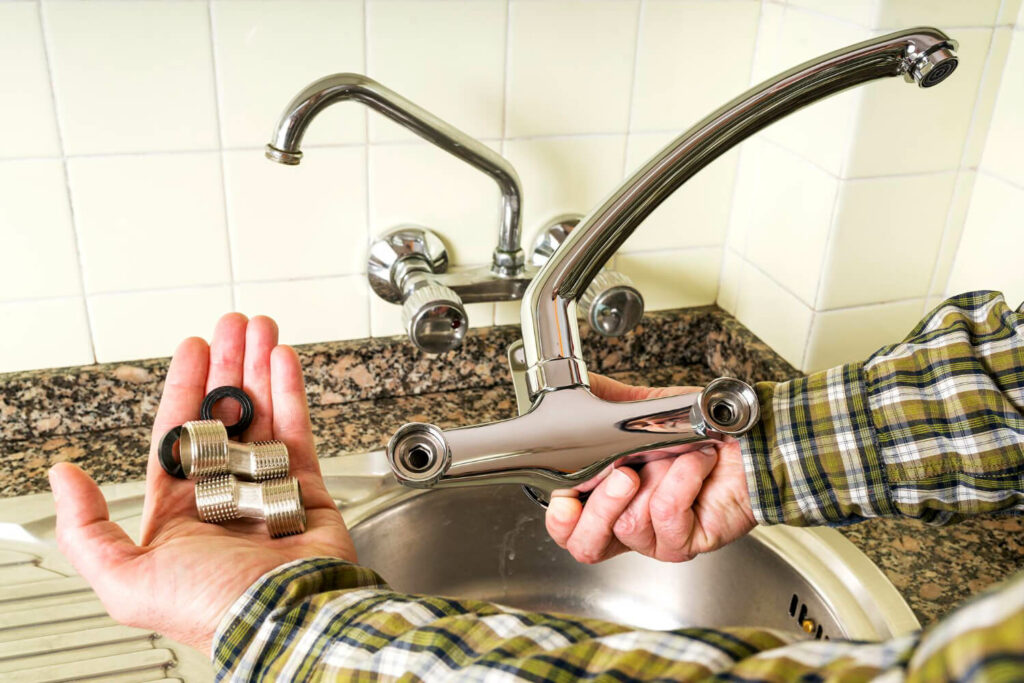
Gather the Necessary Tools and Supplies
Now that you’ve identified the culprit, it’s time to gather your tools and supplies for fixing the issue. Here’s your basic faucet repair arsenal:
- Faucet repair kit: This kit usually contains a variety of washers, O-rings, and sometimes even a replacement cartridge, depending on the brand.
- Adjustable wrench: This versatile tool can loosen and tighten various nuts and fittings around the faucet.
- Phillips head screwdriver: You’ll need this to remove handle screws and access some faucet components.
- Flathead screwdriver: This can be helpful for prying off decorative faucet caps or scraping away mineral buildup.
- Bucket: This will catch any water that spills during disassembly.
- Paper towels or rags: Always helpful for cleaning up spills and wiping down parts.
- Replacement parts (optional): If you suspect a faulty cartridge or ceramic disc, purchase a replacement that matches your specific faucet model. You can usually find this information etched on the faucet handle or body.
Pro Tip: Taking pictures during disassembly can be a lifesaver when it comes to reassembly.
Step-by-Step Guide on How to Fix a Leaky Faucet
Now for the main event! Here’s a general guide to fixing a leaky faucet. Remember, specific steps may vary depending on your faucet type (compression, cartridge, or ceramic disc).
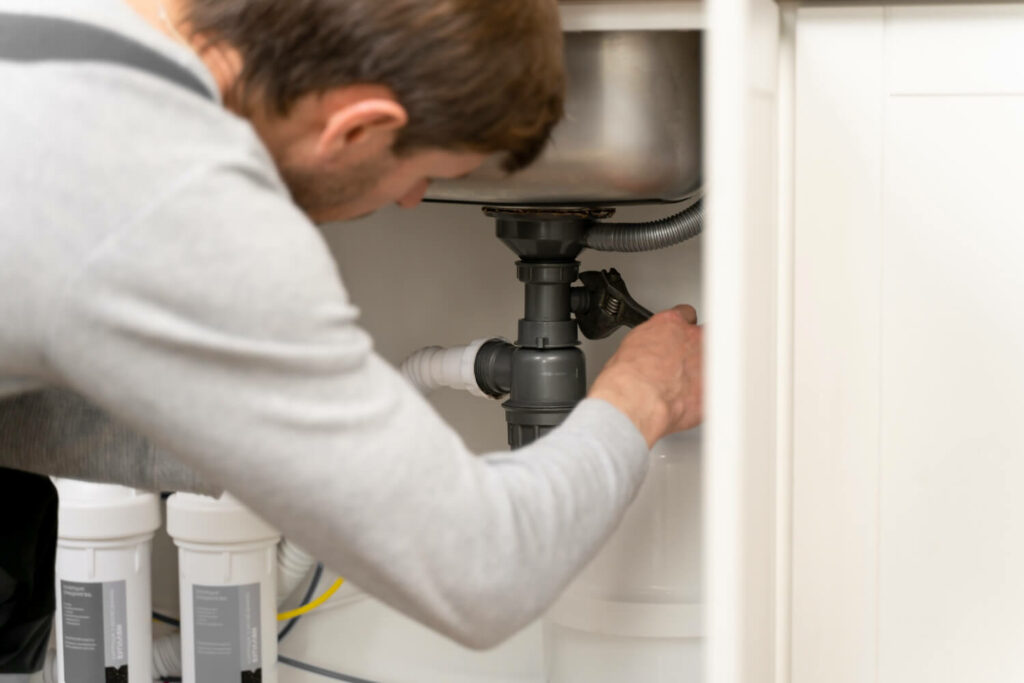
- Turn off the water supply: Locate the shut-off valves under the sink, one for hot and one for cold water. Turn them clockwise until they stop completely. Open the handle of the tap to let out any residual pressure.
- Remove the handle: Depending on the faucet, you might need to remove a screw under the handle or pry off a decorative cap. Consult your faucet manual or a quick online search if needed.
- Access the culprit: Once the handle is off, you’ll see the packing nut and the parts it compresses (usually a washer and O-ring). In cartridge faucets, you’ll need to remove a retaining clip or screw to access the cartridge. For ceramic disc faucets, there might be a retaining screw or clip holding the disc in place.
- Replace the worn-out parts: Here’s where your detective work pays off. If it’s a washer or O-ring, simply replace them with new ones from your repair kit. For a faulty cartridge, remove the old one and replace it with a matching model. Ceramic discs can sometimes be cleaned with vinegar to remove mineral buildup, but in severe cases, they might need replacement.
- Reassemble the faucet: Tighten the packing nut snugly using the adjustable wrench. Be careful not to over-tighten, as this can damage the faucet or washer. Insert the new cartridge and secure it with the retaining clip or screw. Reinstall the cleaned or replaced disc and secure it according to the faucet’s specific mechanism.
- Tighten everything up: Once all the parts are back in place, use your tools to gently tighten any screws or nuts you loosened during disassembly. Remember, snug is enough – don’t go Hulk smash on your faucet!
- Turn on the water supply slowly: Slowly open the shut-off valves under the sink. Watch for any leaks around the faucet handle or base.
- Test and adjust: Turn on the faucet handle and check for leaks. If there’s a slight drip, you might need to slightly tighten the packing nut (compression faucet) or re-seat the cartridge (cartridge faucet). Don’t over-tighten! If the leak persists, there might be a more complex issue requiring a professional plumber.
- Celebrate your victory! You’ve successfully silenced the drip and saved yourself some money. Take a moment to appreciate your newfound DIY plumbing skills.
Tips for Preventing Future Faucet Leaks
Develop a habit of checking your faucets regularly. Look for any signs of leaks, loose handles, or mineral buildup.
- Don’t over-tighten faucet handles. This may deteriorate internal parts and cause leakage.
- Minimize extreme temperature changes. Rapid shifts from hot to cold can stress the faucet components.
- Install a water filter. This can help reduce mineral buildup that can contribute to leaks and wear-and-tear.
- Use gentle cleaning methods. Avoid harsh chemicals that can damage the faucet finish or seals.
When to Call a Plumber for Faucet Repair
While many faucet leaks are DIY-friendly, there are situations where calling a professional plumber is the wiser choice. Here are some signs it’s time to bring in the cavalry:
- The leak is coming from the faucet body itself. This could indicate a crack or other major damage that requires replacement.
- You’ve tried everything and the leak persists. Sometimes, even the most valiant DIY warriors need backup.
- You’re dealing with a complex faucet type. If you have a high-end faucet with intricate mechanisms, it’s best to leave the repairs to a qualified plumber.
- You’re uncomfortable working with plumbing. There’s no shame in admitting your limitations!
Conclusion: Save Time and Money by Fixing That Leaky Faucet Yourself
A leaky faucet doesn’t have to be a plumbing nightmare. With a little detective work, the right tools, and these handy instructions, you can conquer the drip and become a DIY hero.
Remember, the satisfaction of fixing the problem yourself and saving money on a plumber’s visit is a sweet reward. So, next time you hear that annoying drip, grab your tools and get ready to silence it for good!


